How to Deploy Microsoft Office 2007 using Group Policy

Every few years you get the opportunity to update to that new fresh version of Microsoft Office, but you defiantly do not want to go computer to computer uninstalling the old and installing the new version. In the past you have just been able to create an MST and deploy it in group policy, this is not the case anymore. Microsoft is trying to push the System Management Server for most the large corporate environments, however I work at a place where spending money is not so much a popular topic, it is better to solve the problem withe the stuff you already have. Since you can’t make a MST to push out Microsoft Office 2007 customized you get a fancy XML file to play with to customized your installation so you can include things like Product Key, Organization, Display Levels of Installer, Accept the EULA, and which parts of Microsoft Office to install. This XML file is very unfriendly because it is very hard to determine the proper syntax or options since the Microsoft documentation is well… lacking to say the least. Other important things to note, this can only be deployed to as part of a Group Policy for a Computer. It will remind you of this if you try to add the MSI to the Users Group Policy. Microsoft also recommends that you don’t deploy this in large networks because of effects on the bandwidth required to install over the network cannot be managed like they can with System Management Server.

Network Share Setup

  1. Copy your entire Microsoft Office 2007 disk out to a network share that is readable by any user in your domain.
  2. Browse to the Enterprise.WW folder or Pro.WW folder in your deployment network share.
  3. Now Find or Create the config.xml file, scroll down and you can see a sample of mine at the bottom of this post. This is the key file that you will be modifying to customize your deployment of Microsoft Office 2007

Customizing the Microsoft Office 2007 deployment using config.xml
This is where all the magic happens if that is what you want to call it. There is several lines in this file I will try to hit the most important ones that you will need to use. At the bottom of the post you will be able to find the copy my config.xml file that I used for my deployment.

  • <Display Level="full" CompletionNotice="yes" SuppressModal="no" AcceptEula="yes" /> – These options have to do with how setup is displayed to the user.
    Display Level can be set to None, Basic or Full by default it is Full. Full: shows the entire setup to the user and allow them to modify options along the way. Basic: shows a welcome screen, Product Key if not included in config.xml file, EULA if not accepted, progress bar and Completion if allowed.
    CompletionNotice can bet set to Yes or No and is No by default and it will give a final screen showing that it had finished or not.
    SuppressModal can be Yes or No and is No by default and will suppress errors if set to Yes.
    AcceptEula can be set to Yes or No and is No by default, this makes the user accept the license agreement have to accept the EULA if set to No. I would strongly suggest setting this to Yes to save your users the trouble.
  • <PIDKEY Value="xxxxxxxxxxxxxxxxxxxxxxxxx" /> – This is where you insert your product key.
    If you DisplayLevel is set to Basic or None and you enter a product key it will automatically accept the EULA for the installation reguardless of what AcceptEula is set to.
  • <COMPANYNAME Value="My Cool Company" /> – Allows you to modify the organization field for the software registration
  • <OptionState Id="ACCESSFiles" State="Local" Children="force" /> – These lines help determine which parts of Microsoft Office 2007 will be installed. The ID element varies depending on what version of Office you are installing. The State option allows you to determine if you want to install this portion of Office or not. It can be set to Absent, which will not install it, Advertise, which will install on first use, Local, which will install it item, or default which will do the Microsoft default action for the element. The option Children is specific to the ID and if set to force will install all sub items, I prefer this that way you don’t ever have to worry about dependence or special features some user might want to use.
  • <Setting Id="RemovePrevious" Value="ACCESSFiles,EXCELFiles,OUTLOOKFiles,PPTFiles,PubPrimary,WORDFiles" /> – This is an important line if you are wanting it to replace or uninstall the current version of Microsoft Office that is installed like Office 2003 or XP during the installation of Microsoft Office 2007.

Adding the MSI to Group Policy
This next step is very simple as you need to go to the Group Policy that will be in charge of installing Office 2007. Now open up your Group Policy Managment Console and select the GP you plan to use to deploy office, then right click and select edit. Now use the Tree on the Left to browse to Computer Configuration > Software Settings > Software Installation and right click on Software Installation and select New > Packageā€¦ It will now prompt you with an open dialog box, go and select the MSI in the Office deployment directory for Enterprise it is called EnterpriseWW.msi. That’s it! Now just be sure to apply that Group Policy to the correct workstations and you will be good to go. The workstations should get the new version of Office 2007 next time it is restarted. You may want to test deploy it to a few machines to make sure everything goes smoothly.

Resources


Read More

List All Active Directory User Accounts in a CSV

We all know maintaining hundreds of user accounts can be frustrating especially when it comes to audit time and you need a good list of information to pass on to an auditor. Well today I am your savory, this simple script will produce you a list of users with some detailed information that can make audits or documentation much easier. The script creates a Comma Separated Values file or CSV that you can edit in Microsoft Excel or any standard spreadsheet application so you can customize the information before adding it to your report or audit. Below are the specific fields that this script will provide detail on for your Active Directory Users.

User Details

  • Name
  • Description
  • Profile Path
  • Home Drive
  • Account Disabled
  • Password Required
  • User Changable Password
  • Password Expires
  • SmartCard Required
  • Login Count
  • Last Login (date)
  • Last Password Change (date)
  • Created (date)
  • Modified (date)

Script Configuration
Before running this script there is some minor configuration that must be done so it can communicate with your Active Directory setup.

  1. Find objConnection.Open “Active Directory Server” change Active Directory Server to the name of your Domain Controller
  2. Find objCommand.CommandText = _
    “SELECT Name, description, profilePath, homeDrive, distinguishedName,userAccountControl FROM ‘LDAP://dc=subdomain,dc=domain,dc=suffix’ WHERE objectCategory=’user'”
    change subdomain, domain, and suffix to the name of your domain i.e. west consco com (respectively)
  3. Find Set logStream = objFSO.opentextfile(“C:\domainusers.csv”, 8, True) and change C:\domainusers.csv to the location where you want the file saved. Be sure to save it with the extension CSV
On Error Resume Next
Const ADS_SCOPE_SUBTREE = 2

Const ADS_UF_ACCOUNTDISABLE = &H0002 
Const ADS_UF_PASSWD_NOTREQD = &H0020 
Const ADS_UF_PASSWD_CANT_CHANGE = &H0040 
Const ADS_UF_DONT_EXPIRE_PASSWD = &H10000 
Const ADS_UF_SMARTCARD_REQUIRED = &H40000 
 
Set objConnection = CreateObject("ADODB.Connection")
Set objCommand =   CreateObject("ADODB.Command")
objConnection.Provider = "ADsDSOObject"
objConnection.Open "Active Directory Server"
Set objCommand.ActiveConnection = objConnection

objCommand.Properties("Page Size") = 1000
objCommand.Properties("Searchscope") = ADS_SCOPE_SUBTREE 

objCommand.CommandText = _
    "SELECT Name, description, profilePath, homeDrive, distinguishedName,userAccountControl FROM 'LDAP://dc=subdomain,dc=domain,dc=suffix' WHERE objectCategory='user'"  
Set objRecordSet = objCommand.Execute

objRecordSet.MoveFirst
Set objFSO = CreateObject("scripting.filesystemobject")
Set logStream = objFSO.opentextfile("C:\domainusers.csv", 8, True)
logStream.writeline("Name,Description,Profile Path,Home Drive,Account Disabled,Password Required,User Changable Password,Password Expires,SmartCard Required,Login Count,Last Login,Last Password Change,Created,Modified")
Do Until objRecordSet.EOF

	strDN = objRecordset.Fields("distinguishedName").Value 
	Set objUser = GetObject ("LDAP://" & strDN)
	 
	If objRecordset.Fields("userAccountControl").Value AND ADS_UF_ACCOUNTDISABLE Then
		Text = "Yes"
	Else
		Text = "No"
	End If
	If objRecordset.Fields("userAccountControl").Value AND ADS_UF_PASSWD_NOTREQD Then
		Text = Text & ",No"
	Else
		Text = Text & ",Yes"
	End If
	 
	If objRecordset.Fields("userAccountControl").Value AND ADS_PASSWORD_CANT_CHANGE Then
		Text = Text & ",No"
	Else
		Text = Text & ",Yes"
	End If	 
	If objRecordset.Fields("userAccountControl").Value AND ADS_UF_DONT_EXPIRE_PASSWD Then
		Text = Text & ",No"
	Else
		Text = Text & ",Yes"
	End If
	If objRecordset.Fields("userAccountControl").Value AND ADS_UF_SMARTCARD_REQUIRED Then
		Text = Text & ",Yes"
	Else
		Text = Text & ",No"
	End If
	
	logStream.writeline(objRecordset.Fields("Name").Value & ","_
		& objRecordset.Fields("description").Value & ","_
		& objRecordset.Fields("profilePath").Value & ","_
		& objRecordset.Fields("homeDrive").Value & ","_
		& text & ","_
		& objUser.logonCount & ","_
		& objUser.LastLogin & ","_
		& objUser.PasswordLastChanged & ","_
		& objUser.whenCreated & ","_
		& objUser.whenChanged & ","_
		)
		
    objRecordSet.MoveNext
Loop
logStream.Close

Read More

How to Deploy VNC using Group Policy

Do you spend too much time running from desk to desk just to help someone make a shortcut or change the default printer? This could be the solution for you. Using UltraVNC you can remotely view and control their workstation from your desk. This can save you time from running around everywhere, and make your users happier faster by solving their problems on the spot. You can also make your boss happy be making it authenticate with Active Directory. That will ensure that everyone that has the remote support access uses their own username and password, and it is easily managed with Active Directory Groups. VNC works very simply by installing a server on every workstation which allows it to share out the desktop to other clients / viewer programs. By installing the VNC Server on all your workstations it will allow you to connect using the client / viewer application and provide hands on support directly from your workstation.

Requirements

Making the MSI using VNCed
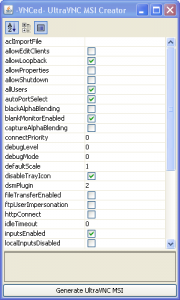
Now that you have the required software, the first thing we need to do is uncompress the VNCed UltraVNC MSI Creator to a folder on your desktop. Once completed, run the run.bat and it should popup a GUI interface you can use to configure different parts of the UltraVNC Server.VNCed UltraVNC MSI Maker
Using this interface you can adjust and explore what options you have to choose from to customize your UltraVNC Deployment for your environment. The defaults here are a pretty good start and you can click on each item to get a description of what it will change. You may want to install this to a test computer a few times before rolling it out.
At this time you also need to configure if you will be using if you will be using Active Directory Authentication or just a plain password.

– To setup the plain password just fill out the password item and leave the newMSLogon unchecked.
– To setup Active Directory Authentication check the newMSLogon and you will need to make a file to select for aclImportFile. This file can either be generated based on the UltraVNC Instructions or you can use my file by creating a text file called: MSACL.ini and pasting allow 0x00000003 "..\Domain Admins in to it. That will allow anyone in the Domain Admins group to have full access to any machine setup using this MSI.

Once you have finished configuring the options for UltraVNC hit the Generate UltraVNC MSI button at the bottom. This will generate your UltraVNC.msi in the folder in which VNCed was extracted to. This file is what you will use to deploy UltraVNC to your workstations.

Using Group Policy to Deploy the MSI
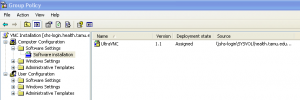
First you will need to open either your Group Policy Management Console (gpmc.msc) and either modify your existing Workstation Group Policy or make a new one just for the deployment of this application depending on how you want to deploy it. By making a different GP to install, it can allow you deploy it just to a few machines, and only change the settings on those machines, where as the workstation method installs it to all workstations. This really up to the requirements of your environment. Either way you will need to look under Group Policy Object for your domain and create one or right click on one and edit it.Group Policy Software Installation
Now use the Tree on the Left to browse to Computer Configuration > Software Settings > Software Installation and right click on Software Installation and select New > Package… It will now prompt you with an open dialog box, go and select the MSI that we created earlier. If all goes well you should end up with something like the screenshot shows to the left. If all goes well now the only thing you have to do is link it to the OUs that you want it to effect if you created a new one , or you let your workstation group policy deploy to all the workstations the next time they restart.

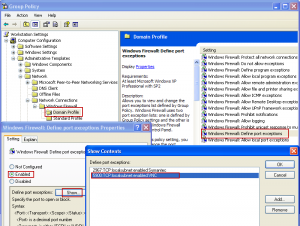
Firewall ConfigurationGroup Policy Firewall Configuration for UltraVNC
If you run a firewall on your machine you will need to allow port 5900 open. If you only running the default Windows Firewall you can configure this using the same group policy that you deployed UltraVNC with. Just go to Computer Configuration > Administrative Templates > Network > Network Connections > Windows Firewall > Domain Profile then select Windows Firewall: Define port exceptions select Enabled then click the Show… button and click Add and fill out the items to specification.

For any other questions you have feel free to leave a comment I will be happy to assist you with the deployment.

For any other detailed information about UltraVNC you should check out their website at http://www.uvnc.com

Read More

Disable Windows Games Using Software Restriction Policy

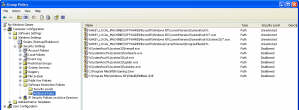
Do you find that your users spend more time in freecell and minesweeper than actually doing work? Then one would say that it is time to block those applications from being started. To do this you can use the Software Restriction Policy that is Built in to Group Policy and your Domain. What you will need to do is create a new Group Policy, you could call it “No Windows Games” and then Edit it and drill down into Computer Configuration > Windows Settings > Security Settings > Software Restriction Policies from there you will probably be presented with “No Software Restriction Policies Defined” now right click back on Software Restriction Polices in the tree view on the left and select Create New Policies. Now you should have the option for Additional Rules. This is where you need your restrictions. Here is the long article about what the different types of rules are, and what you can do with the from Microsoft, but since we just want to block Windows Games we just need to add a New Path Rules with the Disallowed option.

  • %SystemRoot%\system32\freecell.exe
  • %SystemRoot%\system32\mshearts.exe
  • %SystemRoot%\system32\sol.exe
  • %SystemRoot%\system32\spider.exe
  • %SystemRoot%\system32\winmine.exe
  • C:\Program Files\MSN Gaming Zone
  • C:\Program Files\Windows NT\Pinball\PINBALL.EXE

Once these restriction are in place you can link them to the OU or workstations to make them take effect. Your end result should look something like this:
No Windows Games Group Policy

Read More

Remove Temporary Files at Logoff

Over time users tend to open a lot of items programs that write little files to be used just once to print a document or a small setting for a program. These items build up over time and cause your computer to run slower due to your antivirus solution scanning it, your hard drive taking longer to find a free space of disk to write your new file or has to spend more time gathering up fragments of your file from in between these temp files. The solution here is pretty simple, these files need to go, and probably the easiest solution is the remove them when the user logs off. This doesn’t require anymore time for the user and typically isn’t a problem since most computers are logged on and off once a day.

This script will remove the most common temporary folder for the user as well as remove any of the temporary internet files that they have gathered while surfing the web. When we implemented this script we noticed that the antivirus scan time and how many files it scanned were significantly reduced providing a better and faster workstation for your users. This script should be placed in the Group Policy for users as one of their logoff script.

Const TEMPORARY_INTERNET_FILES = &H20&
dim intDepth
 
Set objShell = CreateObject("Shell.Application")
Set objFSO = CreateObject("Scripting.FileSystemObject")

'Clean User Temporary Intenet Files
Set objNameSpace = objShell.Namespace(TEMPORARY_INTERNET_FILES)
Set objFolderItem = objNameSpace.Self
set objFolder=objFSO.GetFolder(objFolderItem.Path)
intDepth=0
RemoveFolder objFolder

'Clean User Temp Files
Const TemporaryFolder = 2
Set tempFolder = objFSO.GetSpecialFolder(TemporaryFolder)
RemoveFolder tempFolder

 
sub RemoveFolder(objFolder)
	' Recursively remove files and folders
	intDepth=intDepth+1
	on error resume next
	for each objFile in objFolder.Files
		objFile.Delete true
	next
	Err.Clear
	on error goto 0
	for each objSubfolder in objFolder.SubFolders
		RemoveFolder objSubFolder
	next
	intDepth=intDepth-1
	if intDepth<>0 then' Don't delete top-level folder
		on error resume next
		objFolder.Delete true 
		err.Clear
		on error goto 0
	end if
end sub

Read More