Audit Windows Network Settings with Powershell

We have been consolidating IT groups at the university for several years now. During this time we have to convert both clients and servers to use our central division Active Directory and other centralized services. However gathering all of the networking information can be quite the task and prone to error. One of the easiest ways I have found to gather all of this information is by running a script to generate CSV file of these settings.

I used this existing script I found over on techibee.com and took it a few steps further.

I added that ability to query Active Directory and find all the computers within an OU and the ability to adjust the filter. This can be handy if you want to find just windows servers or windows clients or just plain windows. I also fixed the output for multiple DNS servers or gateways to a CSV file as well as added some standard header and footers to make the screen output a bit cleaner. This script does require you to have the Active Directory Powershell Module Installed. It will save the CSV to the local directory from which the script is executed and report the path at the end of the screen output. This script should be run with a highly privileged user as it will need to query multiple remote computer using WMI and access Active Directory.

Script

Import-Module ActiveDirectory

$localpath = Get-Location;
$CSVFileName = $localpath.Path + "\Department-Network-Information.csv";

$ComputerName = Get-ADComputer -SearchBase "OU=Department,OU=Division,DC=domain,DC=local" -Filter {OperatingSystem -Like "Windows*"} -Property "Name";

$Results = @()

foreach ($Computer in $ComputerName)
{
    if(Test-Connection -ComputerName $Computer.Name -Count 1 -ea 0) 
    {
        $Networks = Get-WmiObject Win32_NetworkAdapterConfiguration -ComputerName $Computer.Name | ? {$_.IPEnabled};
        foreach ($Network in $Networks) 
        {
            $IPAddress  = $Network.IpAddress[0];
            $SubnetMask  = $Network.IPSubnet[0];
            $DefaultGateway = $Network.DefaultIPGateway;
            $DNSServers  = $Network.DNSServerSearchOrder;
            $IsDHCPEnabled = $false;
            If($network.DHCPEnabled) 
            {
                $IsDHCPEnabled = $true;
            }
            $MACAddress  = $Network.MACAddress;

            if ($DNSServers) 
            {
                $StringDNSServers = [string]::join("; ",$DNSServers);
            }
            else
            {
                $StringDNSServers = " ";
            }

            if($DefaultGateway)
            {
                $StringDefaultGateway = [string]::join("; ",$DefaultGateway);
            }
            else
            {
                $StringDefaultGateway = " ";
            }

            $ReturnedObj = New-Object -Type PSObject;
            $ReturnedObj | Add-Member -MemberType NoteProperty -Name ComputerName -Value $Computer.Name.ToUpper();
            $ReturnedObj | Add-Member -MemberType NoteProperty -Name IPAddress -Value $IPAddress;
            $ReturnedObj | Add-Member -MemberType NoteProperty -Name SubnetMask -Value $SubnetMask;
            $ReturnedObj | Add-Member -MemberType NoteProperty -Name Gateway -Value $StringDefaultGateway;
            $ReturnedObj | Add-Member -MemberType NoteProperty -Name IsDHCPEnabled -Value $IsDHCPEnabled;
            $ReturnedObj | Add-Member -MemberType NoteProperty -Name DNSServers -Value $StringDNSServers;
            $ReturnedObj | Add-Member -MemberType NoteProperty -Name MACAddress -Value $MACAddress;
            $ReturnedObj;
            $Results += $ReturnedObj;
        }
    }  
}

$Results | export-csv $CSVFileName -notype;

Write-Host
Write-Host "File Saved to: $CSVFileName";
Write-Host
Write-Host "Press any key to close ..."
$host.UI.RawUI.ReadKey("NoEcho,IncludeKeyDown")

Screen Output Example

ComputerName  : Computer1
IPAddress     : 194.90.128.89
SubnetMask    : 255.255.255.0
Gateway       : 194.90.128.254
IsDHCPEnabled : True
DNSServers    : 8.8.8.8; 8.8.4.4
MACAddress    : 18:13:73:2A:98:FA

ComputerName  : Computer2
IPAddress     : 194.90.128.92
SubnetMask    : 255.255.255.0
Gateway       : 194.90.128.254
IsDHCPEnabled : True
DNSServers    : 8.8.8.8; 8.8.4.4
MACAddress    : F8:B1:56:AC:FB:2E


File Saved to: D:\Powershell-Scripts\Department-Network-Information.csv

Press any key to close ...

CSV Output

"Computer1","194.90.128.89","255.255.255.0","194.90.128.254","True","8.8.8.8; 8.8.4.4","18:13:73:2A:98:FA"
"Computer2","194.90.128.92","255.255.255.0","194.90.128.254","True","8.8.8.8; 8.8.4.4","F8:B1:56:AC:FB:2E"
Read More

Powershell File Sharing Permissions Report

Often I am asked to verify folder permissions for a user in a specific place out on one of our servers. Typically this requires browsing out the folder and putting eyes on the permissions dialog box looking for a group on which the user is a member and then documenting it in the ticket. A very painful long boring process. This is where Powershell comes and saves the day. I wrote a very simple script to bring that information to me. It also gives nice output that I can directly copy into tickets to answer what groups has rights to what shares.

This prompts the user to “Enter a UNC Path” once entered goes and grabs the NTFS permissions as well as the SMB Share permissions

Powershell Code

Write-Host

$path = Read-host “Enter a UNC Path: ”
$pathparts = $path.split("\")
$ComputerName = $pathparts[2]
$ShareName = $pathparts[3]

Write-Host "File Sharing Permissions Report - $path"
Write-Host 

$acl = Get-Acl $path

Write-Host "File/NTFS Permissions"
Write-Host 

foreach($accessRule in $acl.Access)
{
    Write-Host "   " $accessRule.IdentityReference $accessRule.FileSystemRights
}
Write-Host 
Write-Host "Share/SMB Permissions"
Write-Host

    $Share = Get-WmiObject win32_LogicalShareSecuritySetting -Filter "name='$ShareName'" -ComputerName $ComputerName
    if($Share){
        $obj = @()
        $ACLS = $Share.GetSecurityDescriptor().Descriptor.DACL
        foreach($ACL in $ACLS){
            $User = $ACL.Trustee.Name
            if(!($user)){$user = $ACL.Trustee.SID}
            $Domain = $ACL.Trustee.Domain
            switch($ACL.AccessMask)
            {
                2032127 {$Perm = "Full Control"}
                1245631 {$Perm = "Change"}
                1179817 {$Perm = "Read"}
            }
            Write-Host "   $Domain\$user  $Perm"
        }
    }
Write-Host

Example Output

.\Get-Permissions-NTFS-SMB.ps1

Enter a UNC Path: : \\filesrv\Working Groups
File Sharing Permissions Report - \\filesrv\Working Groups

File/NTFS Permissions

    BUILTIN\Administrators FullControl
    DOMAIN\Domain Admins FullControl
    DOMAIN\Domain Users ReadAndExecute, Synchronize
    DOMAIN\Folder - File Server Admins FullControl

Share/SMB Permissions

   DOMAIN\Domain Admins  Full Control
   DOMAIN\Domain Users  Full Control

Read More

How to Set Permission on a Service Using Subinacl

A couple of months back I was installed some communication software that made a VPN connection to the main server. It used OpenVPN to establish the connection and worked fine as long as your were an administrator on the PC. As I researched it further it installed a service and required that service to run on demand when the user launch the program. Since your standard limited user does not have privileges to start and stop services the application would fail to connect to the server.

So now the question becomes, how do you add permissions to a service?

Microsoft has an answer with a little known command line application called subinacl. This application allows you to view and edit security information for files, registry keys, and services. This can be handy if you are writing a script to change permissions on registry keys or files but the real power lies within the ability to edit the security information on services.

The syntax for subinacl: SUBINACL /SERVICE \\MachineName\ServiceName /GRANT=[DomainName\]UserName[=Access]

The Access parameter is broken down like this:

F : Full Control
R : Generic Read
W : Generic Write
X : Generic eXecute
L : Read controL
Q : Query Service Configuration
S : Query Service Status
E : Enumerate Dependent Services
C : Service Change Configuration
T : Start Service
O : Stop Service
P : Pause/Continue Service
I : Interrogate Service
U : Service User-Defined Control Commands

For my example I just needed to allow the Domain Users group access to run the OpenVPN service.

subinacl /service OpenVPN /GRANT=DOMAIN\Domain Users=TO

You may need to execute this from the folder where subinacl.exe is located. Also if it is running the command on a local system you can just type the name of the service and not the UNC path to the service.

Download subinacl.exe from Microsoft
For more information about this command please visit: http://support.microsoft.com/kb/288129

Read More

Weekly Terminal Services Connection Report using VBS

A few weeks ago we had some state auditors come by and mention that we should review our logs for any sort of outside / vendor access. I knew that going to each server and reviewing the logs manually would be very time consuming and not really provide solid documentation that it was done. I decided that the only way to solve this problem was with a report of some nature. I fired up my trusty Crystal Reports and started to view the logs using that, once I got in to more I realized that when I added the description field of the event log it always crashed Crystal Reports. This left me going to plan B which is writing the reports from scratch using Visual Basic Scripting language.

I already knew that you can use VBS to connect to WMI (Windows Management Interface) and view different parts of the system including the event log, so I spent the morning writing the report and parsing it down to the detail that I really needed. Then I decided to take it to the next level by adding in recursion for multiple servers and also set it up to send an HTML email so it is easy to review every week. Why every week you may ask, well in looking at my event log on my domain server I noticed that I start losing Security events at about 10-14 days out since it is authorizing so much, and a weekly task is a very manageable one.

Script Configuration

  1. Configure the servers that this script will report on. Modify the Servers array for each server that needs to be checked. (Note: all servers need the same login credentials for the script to work)
  2. Find the objMessage.From field and update it with who the email is coming from
  3. Find the objMessage.To Field and update with the email address of the person who will be receiving the report, if you have multiple addresses to send to separate them with a semi-colon (;)
  4. Find the (“http://schemas.microsoft.com/cdo/configuration/smtpserver”) = “smtp-relay.waynezim.com” and update this with your SMTP server, if your server requires authentication you will need to modify this script to include that, a simple Google search should show you what needs to be changed.
  5. This script should be setup to be a scheduled task on one of your servers, the credentials used in setting up the job will be used to connect to the other servers, this account needs to exist on all servers to view the Security Event Log and make the report.
  6. To setup a scheduled task, go to your Control Panel, open Scheduled Tasks, right click New > Scheduled Task, name it, then right click and modify the Properties, Browse to where the script is saved, set the Run as at the bottom for the user that exists on all Servers and set the password. Then go to the Schedule tab and set it to Weekly and change it to run when you want it to.
Dim objWMI, objEvent ' Objects
Dim strComputer ' Strings
Dim intEvent, intNumberID, intRecordNum, colLoggedEvents
'--------------------------------------------
' Server List to Parse Logs
Dim Servers(5)
Servers(0) = "server1"
Servers(1) = "server2"
Servers(2) = "server3"
Servers(3) = "server4"
Servers(4) = "server5"
Servers(5) = "server6"
'--------------------------------------------
' Email Body Heading
HTMLMsg = "<html><body><h3>Remote Desktop Connections from " & cDate(Now() - 7) & " to " & cDate(Now()) & "</h3>"
HTMLMsg = HTMLMsg & "<table border=1><tr><td><b>Computer Name</b></td><td><b>Logon Type</b></td><td><b>Remote IP</b></td><td><b>Date / Time</b></td><td><b>User</b></td></tr>"
'--------------------------------------------
' Next section creates the file to store Events
' Then creates WMI connector to the Logs

'Range Variable - Out of Loop for Common Report Time
WeekAgo = cDate(Now() - 7)

'Start Each Computer Loop
For Each strComputer in Servers
' --------------------------------------------
' Set your variables for Events Loop
intEvent = 1
intRecordNum = 1

Set objWMI = GetObject("winmgmts:" _
& "{impersonationLevel=impersonate}!\\" _
& strComputer & "\root\cimv2")
Set colLoggedEvents = objWMI.ExecQuery _
("Select * from Win32_NTLogEvent Where Logfile = 'Security' AND EventCode = 528 AND TimeWritten > '" & WeekAgo & "'")
' -----------------------------------------
' Next section loops through ID properties
intEvent = 1
	For Each objEvent in colLoggedEvents

	HTMLMsg = HTMLMsg & "<tr><td>" & objEvent.ComputerName & "</td>"
	LogonType = RTrim(Mid(objEvent.Message,InStr(objEvent.Message,"Logon Type:")+12,2))
	If LogonType = 2 Then HTMLMsg = HTMLMsg & "<td>Interactive</td>" End if
	If LogonType = 3 Then HTMLMsg = HTMLMsg & "<td>Network</td>" End if
	If LogonType = 4 Then HTMLMsg = HTMLMsg & "<td>Batch</td>" End if
	If LogonType = 5 Then HTMLMsg = HTMLMsg & "<td>Service</td>" End if
	If LogonType = 7 Then HTMLMsg = HTMLMsg & "<td>Unlock</td>" End if
	If LogonType = 8 Then HTMLMsg = HTMLMsg & "<td>Network using Clear Text</td>" End if
	If LogonType = 9 Then HTMLMsg = HTMLMsg & "<td>New Credentials</td>" End if
	If LogonType = 10 Then HTMLMsg = HTMLMsg & "<td>Remote Interactive</td>" End if
	If LogonType = 11 Then HTMLMsg = HTMLMsg & "<td>Cached Interaction</td>" End if

	IPlen = InStr(InStr(objEvent.Message,"Source Network Address:")+24,objEvent.Message,"	") - InStr(objEvent.Message,"Source Network Address:") - 28
	RemoteAddress = RTrim(Mid(objEvent.Message,InStr(objEvent.Message,"Source Network Address:")+24,IPlen))
	HTMLMsg = HTMLMsg & "<td>" & RemoteAddress & "</td>"
	EventTime = Mid(objEvent.TimeWritten, 5, 2) & "/" & Mid(objEvent.TimeWritten, 7, 2) & "/" & Mid(objEvent.TimeWritten, 1, 4) & " " & Mid(objEvent.TimeWritten, 9, 2) & ":" & Mid(objEvent.TimeWritten, 11, 2) & "." & Mid(objEvent.TimeWritten, 13, 2)
	HTMLMsg = HTMLMsg & "<td>" & EventTime & "</td>"
	HTMLMsg = HTMLMsg & "<td>" & objEvent.User & "</td></tr>"
	intRecordNum = intRecordNum +1
	IntEvent = intEvent +1

	Next
Next

Set objMessage = CreateObject("CDO.Message")
objMessage.Subject = "Remote Connections Report: " & cDate(Now())
objMessage.From = "root@waynezim.com"
objMessage.To = "waynezim@waynezim.com"
objMessage.HTMLBody = HTMLMsg
'==This section provides the configuration information for the remote SMTP server.
'==Normally you will only change the server name or IP.
objMessage.Configuration.Fields.Item _
("http://schemas.microsoft.com/cdo/configuration/sendusing") = 2
'Name or IP of Remote SMTP Server
objMessage.Configuration.Fields.Item _
("http://schemas.microsoft.com/cdo/configuration/smtpserver") = "smtp-relay.waynezim.com"
'Server port (typically 25)
objMessage.Configuration.Fields.Item _
("http://schemas.microsoft.com/cdo/configuration/smtpserverport") = 25
objMessage.Configuration.Fields.Update
'==End remote SMTP server configuration section==

objMessage.Send
WScript.Quit

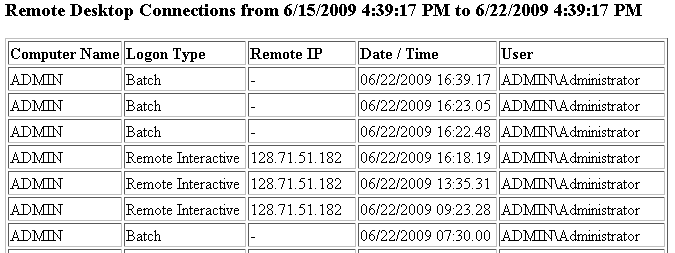
Report Preview
If you need help decoding what Logon Type really means check out this great article.

remote-connection-report-preview

Read More

How to Remotely Import and Export Registry Settings with Multiple Computers

Following up to my article about different ways you can manage your computers remotely, I wrote about modifying the registry across the network and explained how that could simply your IT world. Now I am going to show you a neat trick that can save you from running around and changing different registry keys on every computer, and let your fingers do the walking for you.

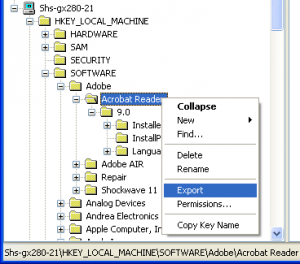
The Microsoft Registry Editor is one of the most powerful applications in the Windows system, mostly because it controls all the other settings for all the other programs installed on the computer. Even better is the fact that it will allows you to import and export even when you are accessing the computer across the network. For my example here I will be exporting system settings for Adobe Acrobat Reader and importing them on another machine. This would be the same process for any other application or system preference that is stored in the registry.
registry-export

  1. Open up the registry editor by going to Start > Run and typing regedit then press OK
  2. To open up another machines registry just go to File > Connect Network Registry… You can open several computers registry all at the same time. You will need to open all the computers registry to be able to import the registry settings.
  3. Now browse to the key that you would like to Export, then right in the treeview on the left, right click and select Export. Now save it some where like your desktop where you can easily find it again. This makes a .reg file that you can import to your computer or others.
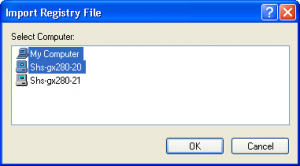
  4. Now go to your File menu and select Import, it will prompt you for the location of the file then press Open on the dialog box. Then it will show you a selection of the several PCs registry that you have open, you can select one or as many computers as you would like to import the registry setting to, it will import it to the same location you exported it from. Depending on the number of computers you selected you should get as many confirmations that it was imported correctly.

registry-import-mutiple-computersIt’s that simple and you have now updated registry settings for several computers without having to leave the comfort (or discomfort) of your desk chair. This is perfect to update any setting that is stored in the registry and is constant across all the workstations. Now remember admins, work smart not hard.

Read More