Audit Windows Network Settings with Powershell

We have been consolidating IT groups at the university for several years now. During this time we have to convert both clients and servers to use our central division Active Directory and other centralized services. However gathering all of the networking information can be quite the task and prone to error. One of the easiest ways I have found to gather all of this information is by running a script to generate CSV file of these settings.

I used this existing script I found over on techibee.com and took it a few steps further.

I added that ability to query Active Directory and find all the computers within an OU and the ability to adjust the filter. This can be handy if you want to find just windows servers or windows clients or just plain windows. I also fixed the output for multiple DNS servers or gateways to a CSV file as well as added some standard header and footers to make the screen output a bit cleaner. This script does require you to have the Active Directory Powershell Module Installed. It will save the CSV to the local directory from which the script is executed and report the path at the end of the screen output. This script should be run with a highly privileged user as it will need to query multiple remote computer using WMI and access Active Directory.

Script

Import-Module ActiveDirectory

$localpath = Get-Location;
$CSVFileName = $localpath.Path + "\Department-Network-Information.csv";

$ComputerName = Get-ADComputer -SearchBase "OU=Department,OU=Division,DC=domain,DC=local" -Filter {OperatingSystem -Like "Windows*"} -Property "Name";

$Results = @()

foreach ($Computer in $ComputerName)
{
    if(Test-Connection -ComputerName $Computer.Name -Count 1 -ea 0) 
    {
        $Networks = Get-WmiObject Win32_NetworkAdapterConfiguration -ComputerName $Computer.Name | ? {$_.IPEnabled};
        foreach ($Network in $Networks) 
        {
            $IPAddress  = $Network.IpAddress[0];
            $SubnetMask  = $Network.IPSubnet[0];
            $DefaultGateway = $Network.DefaultIPGateway;
            $DNSServers  = $Network.DNSServerSearchOrder;
            $IsDHCPEnabled = $false;
            If($network.DHCPEnabled) 
            {
                $IsDHCPEnabled = $true;
            }
            $MACAddress  = $Network.MACAddress;

            if ($DNSServers) 
            {
                $StringDNSServers = [string]::join("; ",$DNSServers);
            }
            else
            {
                $StringDNSServers = " ";
            }

            if($DefaultGateway)
            {
                $StringDefaultGateway = [string]::join("; ",$DefaultGateway);
            }
            else
            {
                $StringDefaultGateway = " ";
            }

            $ReturnedObj = New-Object -Type PSObject;
            $ReturnedObj | Add-Member -MemberType NoteProperty -Name ComputerName -Value $Computer.Name.ToUpper();
            $ReturnedObj | Add-Member -MemberType NoteProperty -Name IPAddress -Value $IPAddress;
            $ReturnedObj | Add-Member -MemberType NoteProperty -Name SubnetMask -Value $SubnetMask;
            $ReturnedObj | Add-Member -MemberType NoteProperty -Name Gateway -Value $StringDefaultGateway;
            $ReturnedObj | Add-Member -MemberType NoteProperty -Name IsDHCPEnabled -Value $IsDHCPEnabled;
            $ReturnedObj | Add-Member -MemberType NoteProperty -Name DNSServers -Value $StringDNSServers;
            $ReturnedObj | Add-Member -MemberType NoteProperty -Name MACAddress -Value $MACAddress;
            $ReturnedObj;
            $Results += $ReturnedObj;
        }
    }  
}

$Results | export-csv $CSVFileName -notype;

Write-Host
Write-Host "File Saved to: $CSVFileName";
Write-Host
Write-Host "Press any key to close ..."
$host.UI.RawUI.ReadKey("NoEcho,IncludeKeyDown")

Screen Output Example

ComputerName  : Computer1
IPAddress     : 194.90.128.89
SubnetMask    : 255.255.255.0
Gateway       : 194.90.128.254
IsDHCPEnabled : True
DNSServers    : 8.8.8.8; 8.8.4.4
MACAddress    : 18:13:73:2A:98:FA

ComputerName  : Computer2
IPAddress     : 194.90.128.92
SubnetMask    : 255.255.255.0
Gateway       : 194.90.128.254
IsDHCPEnabled : True
DNSServers    : 8.8.8.8; 8.8.4.4
MACAddress    : F8:B1:56:AC:FB:2E


File Saved to: D:\Powershell-Scripts\Department-Network-Information.csv

Press any key to close ...

CSV Output

"Computer1","194.90.128.89","255.255.255.0","194.90.128.254","True","8.8.8.8; 8.8.4.4","18:13:73:2A:98:FA"
"Computer2","194.90.128.92","255.255.255.0","194.90.128.254","True","8.8.8.8; 8.8.4.4","F8:B1:56:AC:FB:2E"
Read More

Report Workstation Uptime in a CSV using Active Directory and VBS

Have you ever been left wondering which computers on your domain have been neglected by their user and not restarted in forever? This is a question that come up in my office every once and a while. One of the easiest ways to solve this problem is to ask WMI for when the computer was last restarted and subtract it from the current time. Also, while asking WMI questions you might as well ask which user is currently logged on the PC that way you know who to blame. This is exactly what the following script does for your domain. It grabs the list of workstations from the domain then queries WMI for the last time the computer is restarted and does some conversion and math and makes you an nice CSV that you can play with.

Script Configuration
Before running this script there is some minor configuration that must be done so it can communicate with your Active Directory setup.

  1. Find objConnection.Open “Active Directory Server” change Active Directory Server to the name of your Domain Controller
  2. Find objCommand.CommandText = _
    “Select Name, Location from ‘LDAP://OU=Workstations,DC=west,DC=domain,DC=edu’ ” _
    & “Where objectClass=’computer'”
    change subdomain, domain, and suffix to the name of your domain i.e. west domain edu (respectively)
  3. Find GetUptime objRecordSet.Fields(“Name”).Value, “C:\uptime.csv” and change C:\uptime.csv to the location where you want the file saved. Be sure to save it with the extension CSV
Const ADS_SCOPE_SUBTREE = 2

Set objConnection = CreateObject("ADODB.Connection")
Set objCommand =   CreateObject("ADODB.Command")
objConnection.Provider = "ADsDSOObject"
objConnection.Open "Active Directory Server" 

Set objCOmmand.ActiveConnection = objConnection
objCommand.CommandText = _
    "Select Name, Location from 'OU=Workstations,DC=west,DC=domain,DC=edu' " _
        & "Where objectClass='computer'"  
objCommand.Properties("Page Size") = 1000
objCommand.Properties("Searchscope") = ADS_SCOPE_SUBTREE 
Set objRecordSet = objCommand.Execute
objRecordSet.MoveFirst

Do Until objRecordSet.EOF
	GetUptime objRecordSet.Fields("Name").Value, "C:\uptime.csv"
    objRecordSet.MoveNext
Loop

Sub GetUptime(strComputer, strFilename)
	On Error Resume Next
	Set StdOut = WScript.StdOut
	 
	Set objFSO = CreateObject("scripting.filesystemobject")
	Set logStream = objFSO.opentextfile(strFilename, 8, True)
	 
	Set oReg=GetObject("winmgmts:{impersonationLevel=impersonate}!\\" & strComputer & "\root\default:StdRegProv")
	If Err.Number Then
	      logStream.writeline(strComputer & ",Offline")
	      Err.Clear
	Else
		Set objWMIService = GetObject _
			("winmgmts:\\" & strComputer & "\root\cimv2")
		Set colOperatingSystems = objWMIService.ExecQuery _
			("Select * from Win32_OperatingSystem")
		For Each objOS in colOperatingSystems
			dtmBootup = objOS.LastBootUpTime
			dtmLastBootupTime = WMIDateStringToDate(dtmBootup)
			dtmSystemUptime = DateDiff("h", dtmLastBootUpTime, Now()) 
		Next
		Set objWMIService = GetObject _
			("winmgmts:\\" & strComputer & "\root\cimv2")
		Set colComputerSys = objWMIService.ExecQuery _
			("Select UserName from Win32_ComputerSystem")
		For Each objCS in colComputerSys
			username = objCS.UserName
			logStream.writeline(strComputer & ",Online," & dtmSystemUptime & "," & dtmLastBootupTime & "," & username) 
		Next
				
	End If
	logStream.Close
End Sub
Function WMIDateStringToDate(dtmBootup)
    WMIDateStringToDate = CDate(Mid(dtmBootup, 5, 2) & "/" & _
         Mid(dtmBootup, 7, 2) & "/" & Left(dtmBootup, 4) _
         & " " & Mid (dtmBootup, 9, 2) & ":" & _
         Mid(dtmBootup, 11, 2) & ":" & Mid(dtmBootup, _
         13, 2))
End Function

Read More

How to Use WMI Filtering to Improve Group Policy Administration

Group policy is one of the most versatile and powerful ways to manage your workstations in your domain. However, using just basic Group Policy to object relationship links you can limit the customization that is possible with group policy. Today I will show you how to add WMI (Windows Management Interface) Filtering to your group policy. This will allow you to build a kind of rule, and allow you to pick and choose which workstations get the policy and which don’t. My goal today is to apply my group policy to only workstations that start with the name of shs-exam. This is basically all the workstations that reside in our exam rooms and I would like them to have a special set of settings, however I want them to co-exist in my Active Directory structure in the proper ‘departmental’ organizational units that I already have.
Requirementswmi-query

Configuration

  1. Open your Group Policy Management Console and browse to WMI Filters in your Domain.
  2. Go ahead and Right Click on WMI Filters and select New
  3. Give the WMI Filter a nice descriptive name and give more detailed text in the Description if needed.
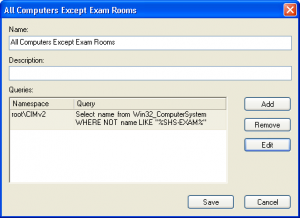
  4. To build your actual query for WMI you need to think of this as a question to ask the PC and if it returns any result then the Group Policy will be applied to it. The query I have built asks it to return name for the computer and if the name contains “SHS-EXAM” then it will return the name and get the group policy applied, if not then nothing happens and the group policy is skipped.
  5. group-policy-scope-wmi-filtering

  6. Add your WMI Query, mine is Select name from Win32_ComputerSystem WHERE NOT name LIKE “%SHS-EXAM%” This will basically select all computers that are not named “SHS-EXAM”
  7. Now press Save
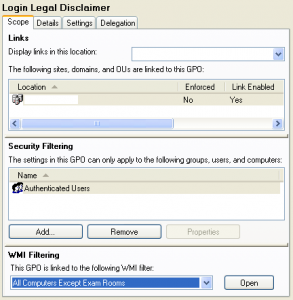
  8. Now that we have successfully made the WMI Filter we need to apply it to the proper group policy, so go to your Group Policy Objects under your domain and select the one you wish to add the filter to.
  9. The last section on the screen should be WMI Filtering, just drop down the list and select the WMI Filter you just made

Reference Material

  • WQL (SQL for WMI) (Windows) – This is a great list of advanced operators and examples to get you close the the proper syntax
  • HOWTO: Leverage Group Policies with WMI Filters – This article explains in detail how to create a WMI filter to determine the scope of a Group Policy based on computer attributes.
  • Paessler WMI Tester – This tool can help you test your WMI queries before deploying them in Group Policy use. I use this tool all the time to help find information about a workstation.
  • Microsoft Win32 Classes Reference – This is a Microsoft’s reference for all of the objects and events for WMI. You can use this to find that specific settings you need to filter on.

Read More

How to Setup a Legal Notice Before Login in Group Policy

A few days ago I was tasked with setting up a notice to users before the actually log on to the computer to notify them that if they use this computer they agree to blah.. blah.. blah legal stuff. To solve this, I decided that this would be good to see on every computer we have in the organization so I added it to the Default Domain Policy, but this can be applied to users or computers at any level you see fit. This is a very easy setting that may also substitute for signing the computer usage agreements every year.

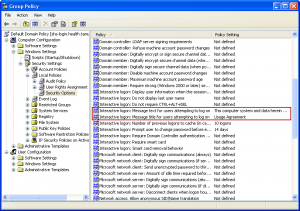
    legal-notice-group-policy-settings

  1. Open up your Group Policy Management Console (gpmc.msc)
  2. Go to the Group Policy Object in your domain, right click on Default Domain Policy and select Edit…
  3. Once the Group Policy Editor is up, using the treeview on on the left go to Computer Configuration > Windows Settings > Security Settings > Local Policies > Security Options
  4. To edit the title of the windows change: Interactive logon:Message title for users attempting to log on
  5. To edit the message text change: Interactive Logon:Message text for users attempting to log on

Read More

How to Deploy Microsoft Office 2007 using Group Policy

Every few years you get the opportunity to update to that new fresh version of Microsoft Office, but you defiantly do not want to go computer to computer uninstalling the old and installing the new version. In the past you have just been able to create an MST and deploy it in group policy, this is not the case anymore. Microsoft is trying to push the System Management Server for most the large corporate environments, however I work at a place where spending money is not so much a popular topic, it is better to solve the problem withe the stuff you already have. Since you can’t make a MST to push out Microsoft Office 2007 customized you get a fancy XML file to play with to customized your installation so you can include things like Product Key, Organization, Display Levels of Installer, Accept the EULA, and which parts of Microsoft Office to install. This XML file is very unfriendly because it is very hard to determine the proper syntax or options since the Microsoft documentation is well… lacking to say the least. Other important things to note, this can only be deployed to as part of a Group Policy for a Computer. It will remind you of this if you try to add the MSI to the Users Group Policy. Microsoft also recommends that you don’t deploy this in large networks because of effects on the bandwidth required to install over the network cannot be managed like they can with System Management Server.

Network Share Setup

  1. Copy your entire Microsoft Office 2007 disk out to a network share that is readable by any user in your domain.
  2. Browse to the Enterprise.WW folder or Pro.WW folder in your deployment network share.
  3. Now Find or Create the config.xml file, scroll down and you can see a sample of mine at the bottom of this post. This is the key file that you will be modifying to customize your deployment of Microsoft Office 2007

Customizing the Microsoft Office 2007 deployment using config.xml
This is where all the magic happens if that is what you want to call it. There is several lines in this file I will try to hit the most important ones that you will need to use. At the bottom of the post you will be able to find the copy my config.xml file that I used for my deployment.

  • <Display Level="full" CompletionNotice="yes" SuppressModal="no" AcceptEula="yes" /> – These options have to do with how setup is displayed to the user.
    Display Level can be set to None, Basic or Full by default it is Full. Full: shows the entire setup to the user and allow them to modify options along the way. Basic: shows a welcome screen, Product Key if not included in config.xml file, EULA if not accepted, progress bar and Completion if allowed.
    CompletionNotice can bet set to Yes or No and is No by default and it will give a final screen showing that it had finished or not.
    SuppressModal can be Yes or No and is No by default and will suppress errors if set to Yes.
    AcceptEula can be set to Yes or No and is No by default, this makes the user accept the license agreement have to accept the EULA if set to No. I would strongly suggest setting this to Yes to save your users the trouble.
  • <PIDKEY Value="xxxxxxxxxxxxxxxxxxxxxxxxx" /> – This is where you insert your product key.
    If you DisplayLevel is set to Basic or None and you enter a product key it will automatically accept the EULA for the installation reguardless of what AcceptEula is set to.
  • <COMPANYNAME Value="My Cool Company" /> – Allows you to modify the organization field for the software registration
  • <OptionState Id="ACCESSFiles" State="Local" Children="force" /> – These lines help determine which parts of Microsoft Office 2007 will be installed. The ID element varies depending on what version of Office you are installing. The State option allows you to determine if you want to install this portion of Office or not. It can be set to Absent, which will not install it, Advertise, which will install on first use, Local, which will install it item, or default which will do the Microsoft default action for the element. The option Children is specific to the ID and if set to force will install all sub items, I prefer this that way you don’t ever have to worry about dependence or special features some user might want to use.
  • <Setting Id="RemovePrevious" Value="ACCESSFiles,EXCELFiles,OUTLOOKFiles,PPTFiles,PubPrimary,WORDFiles" /> – This is an important line if you are wanting it to replace or uninstall the current version of Microsoft Office that is installed like Office 2003 or XP during the installation of Microsoft Office 2007.

Adding the MSI to Group Policy
This next step is very simple as you need to go to the Group Policy that will be in charge of installing Office 2007. Now open up your Group Policy Managment Console and select the GP you plan to use to deploy office, then right click and select edit. Now use the Tree on the Left to browse to Computer Configuration > Software Settings > Software Installation and right click on Software Installation and select New > Packageā€¦ It will now prompt you with an open dialog box, go and select the MSI in the Office deployment directory for Enterprise it is called EnterpriseWW.msi. That’s it! Now just be sure to apply that Group Policy to the correct workstations and you will be good to go. The workstations should get the new version of Office 2007 next time it is restarted. You may want to test deploy it to a few machines to make sure everything goes smoothly.

Resources


Read More